Year-end Technology Tips
If you've been counting, you'll know that we have less than 20 days of school left. As thoughts of sunny days at the lake and barbecues with friends start creeping into our minds, it can be easy to miss the little details. Today I want to share a few tips on how to wrap up your tech for the year so that you can make the easiest back-to-school transition possible after a summer of fun.1. Move your Schoology class resources to a collection in your personal resources
If you have been posting files, links, quizzes and other items directly to your Schoology classes without saving them to resources first they will end up being harder to find next year. To avoid this create a new collection by clicking 'Resources' from the top of the main page and then 'Personal'. Create a new collection for each class that you teach by clicking the icon that has a file box with a little green plus sign on it. Think of these collections as your own digital filing cabinet in which you can put all of your class resources. Once resources are in collections you can pick and choose what to add to your classes in the future.


Once you have a collection created, navigate back to the 'Materials' section in one of the classes that you have resources that you would like to save. Next to each resource or folder of resources, click the gear icon and then 'Save to Resources'. Select the collection that you would like to save to.
The resources will now be easy to find in your collection next year as you start planning out the coursework for your students. In the fall, just find your collection, click the gear icon next to an item and select 'Add to Class'. You will then be able to check the boxes of all of the classes you want it to go to.
2. Share collections with other colleagues
Remember that you can share these resource collections with colleagues! Open one of your resource collections, click the share button and then type in the names of your colleagues that you wish to share with. Your collaborators can all add to the collection and still independently choose what to use with their own classes. This is great for dividing the workload or helping out a colleague that is new to the department.

3. Finding things in archived courses
So you've ignored my advice in the first tip and now want to find the resources that you added to an old class that has since "disappeared." Don't worry, there's still hope for you. Click on 'Courses' and then 'See All'. You will now see a list of your current course and there will be a little button that says 'Archived'. Click that to bring up a list of all of your courses from previous grading periods that no longer appear in your course list on the homepage.
4. Archive Google Classroom courses

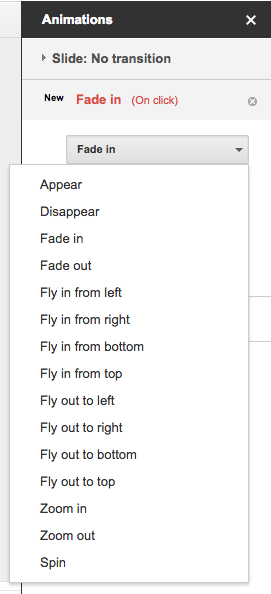
Animation Improvements in Google Slides
Animations are an easy way to make your presentations look more dynamic in Google Slides. You can now improve your Slides presentations with two new animations: Appear and Disappear. You can also now set the direction (to and from left, right, top, and bottom) of two previously existing animations: Fly in and Fly out.